Turn an image sequence or photo slideshow into MP4
A render sequence needs one image per video frame; a slideshow needs time to look at each photograph. Start with that choice, then check order, dimensions and duration before encoding on your own device.
# Turn an image sequence or photo slideshow into MP4
A render sequence needs one image per video frame; a slideshow needs time to look at each photograph. Start with that choice, then check order, dimensions and duration before encoding on your own device.
[Open the Images to Video](https://abox.tools/images-to-video/): Make an MP4 from a render sequence, timelapse photos or a slideshow.
Last updated 23 October 2026
## The short answer
Open [Images to Video](https://abox.tools/images-to-video/), drop the pictures in, put them in order, choose seconds for a slideshow or frames for an image sequence, set how long each one is held, and create the video. MP4 with H.264 is the recommended output; check it in the receiving app before sharing.
The two settings that most often need a second pass are the duration and the resolution, and they are worth understanding before the first render rather than after it.
## A numbered render sequence to MP4
1. In [Images to Video](https://abox.tools/images-to-video/), add the still frames exported by Blender, After Effects or another renderer. Use an image format your browser can decode, such as PNG or JPG.
2. Choose Sort by name. The sort understands numbers, so frame_2 comes before frame_10. Check the list for missing frames or an unwanted restart in numbering.
3. Leave Hold every image for at one frame and set the frame rate to the render's rate. A sequence of 240 images at 24 fps lasts ten seconds.
4. Choose the output dimensions and Fit inside to preserve the whole image. Transparent areas become the selected backdrop: H.264 MP4 does not retain alpha.
5. Create the video, watch the beginning and end, then download it and open it in the app that will receive it.
A folder of timelapse photographs follows the same steps. Frame rate sets playback speed; Sort by date uses file modification time, so check the order if the photographs have been copied or edited. For an existing video clip, use [Time-Lapse Maker](https://abox.tools/timelapse-video/) instead.
## A slideshow, stop motion or a record of progress
For holiday photos, an event recap or a product catalogue, switch Hold every image for to seconds, enter a hold such as three, and press Apply to all. Arrange the tiles into the story you want, choose 1080p or the destination's vertical shape, and use Fit inside when every part of a photograph matters. Check the total length before rendering, then watch the first, middle and last pictures in the finished video.
For stop motion, a render sequence or regularly spaced progress photographs, use frame holds instead: one image held for one frame at 24 fps gives 24 images a second. Sort by name and inspect the order before exporting. This tool writes hard cuts between stills, with no zoom, crossfade or soundtrack. A narrated presentation needs another editor for sound; a silent visual progress record can be complete here.
## Frame rate and duration are not the same thing
This is the confusion that costs people a re-render.
**Duration in seconds** is how long each picture stays on screen. It is the setting you actually care about. Three seconds is a comfortable default for a slideshow somebody is watching; one to two seconds feels brisk; anything over five drags unless there is narration over it.
**Frame rate, with seconds selected,** is how many times a second the video repeats that picture. It changes nothing about what the slideshow looks like — a still image held for three seconds looks identical at 24 frames per second and at 60 — and it changes the file size and the encoding time quite a lot.
The tool starts with one frame per image. In that unit, frame rate does change the duration: 24 images at 24 fps last one second, while the same list at 12 fps lasts two. Switch to seconds for a plain slideshow; 24 or 30 fps is plenty. There are no pans, zooms or crossfades in this tool, so a higher rate adds no motion to a still.
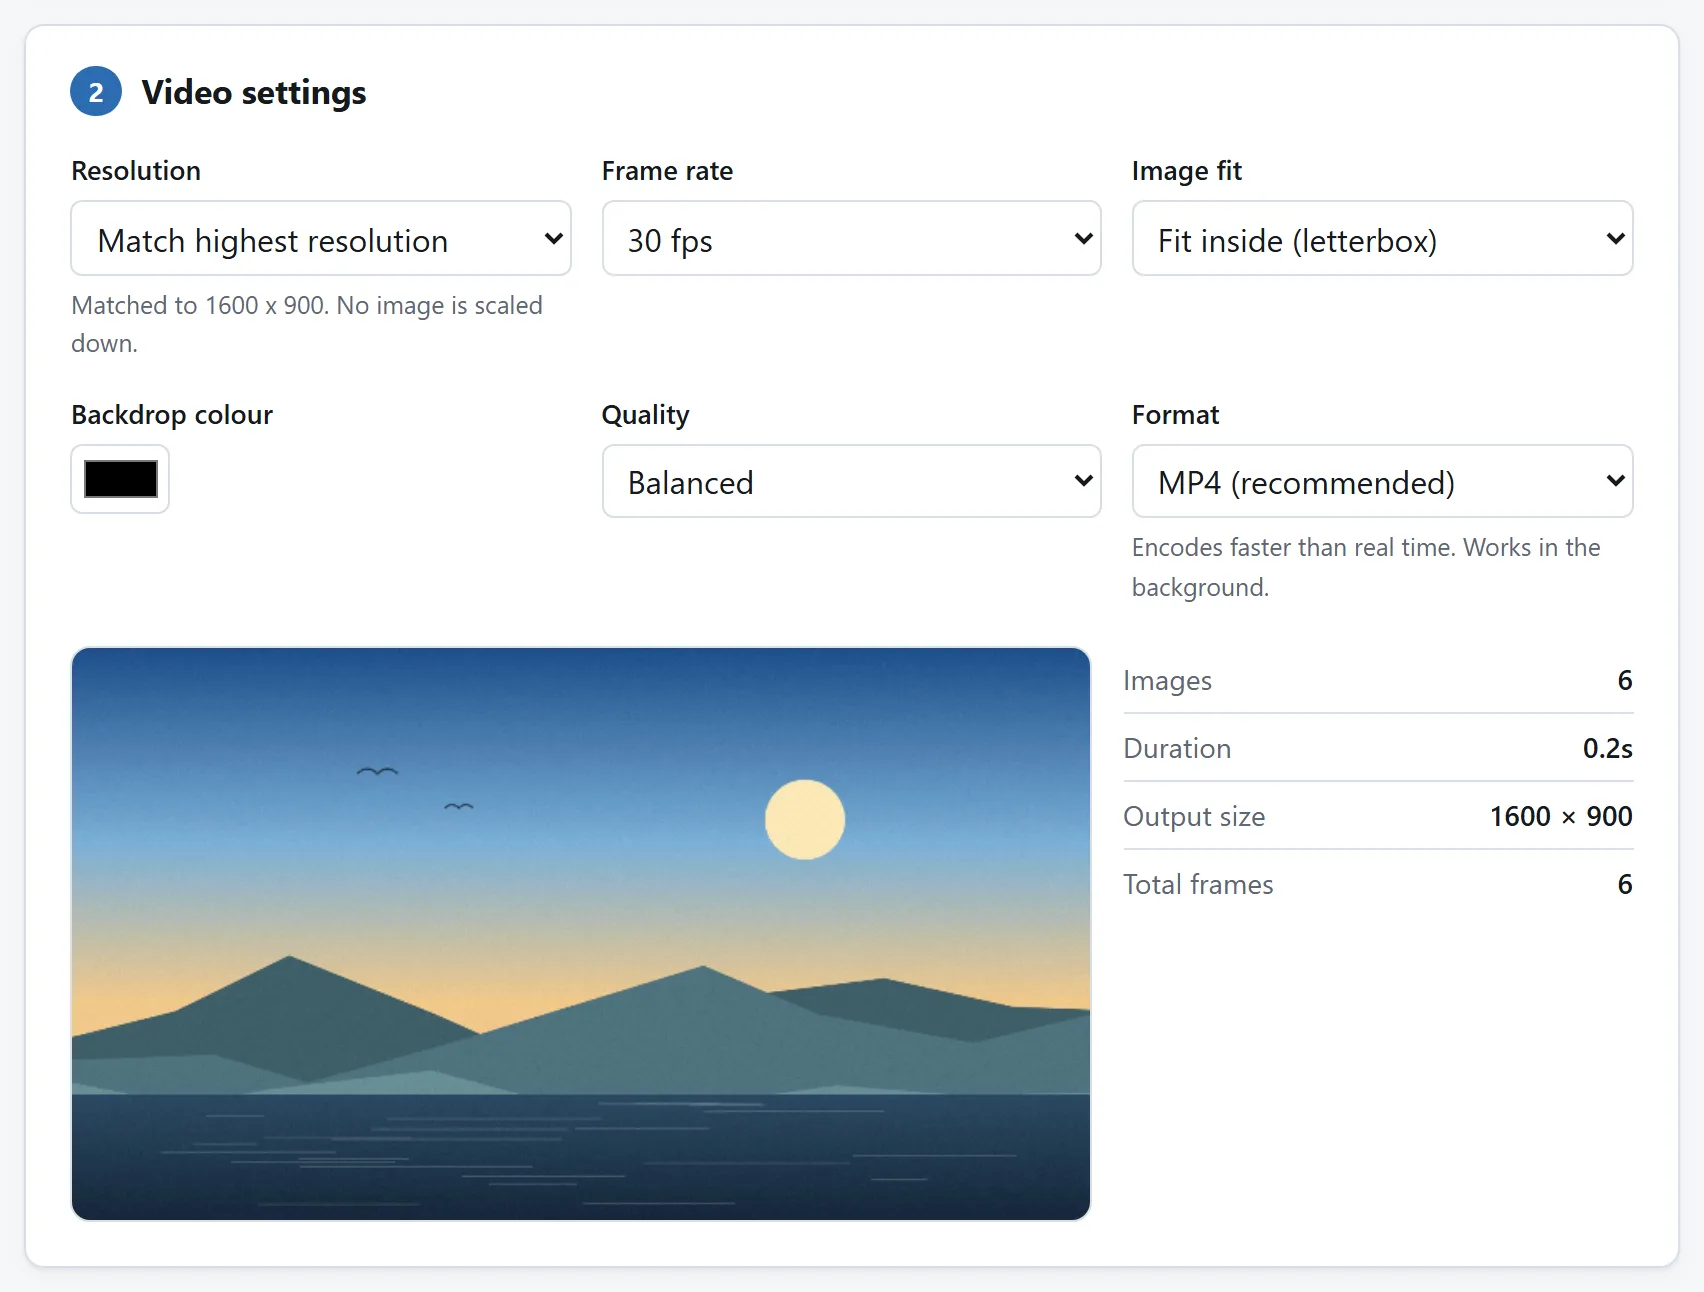
With seconds selected, changing the frame rate changes the frame count while each image keeps its chosen duration. With frame holds, it changes the length too.
## Resolution, and pictures of the wrong shape
A video has one frame size for its whole length. Your photographs almost certainly do not all share one, so something has to happen to the ones that do not fit — and that something is the choice worth making deliberately.
Start by picking the resolution from where the video is going:
- **1920×1080** for anything general. Universally supported, plays everywhere, and is what most people mean by HD.
- **1080×1920** — the same numbers the other way round — for a phone-first destination: stories, reels, shorts.
- **3840×2160** only if the pictures genuinely have that much detail and the destination will show it. It is four times the pixels, four times the encoding time, and roughly four times the file.
Then decide what happens to the mismatches. Fitting each picture inside the frame keeps all of it and leaves bars at the sides — safe, and the right answer when the pictures matter more than the presentation. Filling the frame and cropping the overflow looks better and will cut the top off some of them. Mixing portrait and landscape photographs in one video is the case where there is no good answer; deciding in advance which way you would rather be wrong saves a re-render.
## Order, and the file-name trap
As with any batch job, file names sort in a way that is not the way you counted. `photo2.jpg` comes after `photo10.jpg` in an alphabetical sort, because the comparison is character by character.
Sort by name counts numeric filenames naturally, so photo2 comes before photo10 here. Sort by date uses the files' modification dates, not a guaranteed camera capture time; copied or edited photographs can therefore need manual reordering. Dragging the tiles is right for anything where the story is not chronological. Check before you render: the video is the one artefact where fixing the order means doing the whole job again.
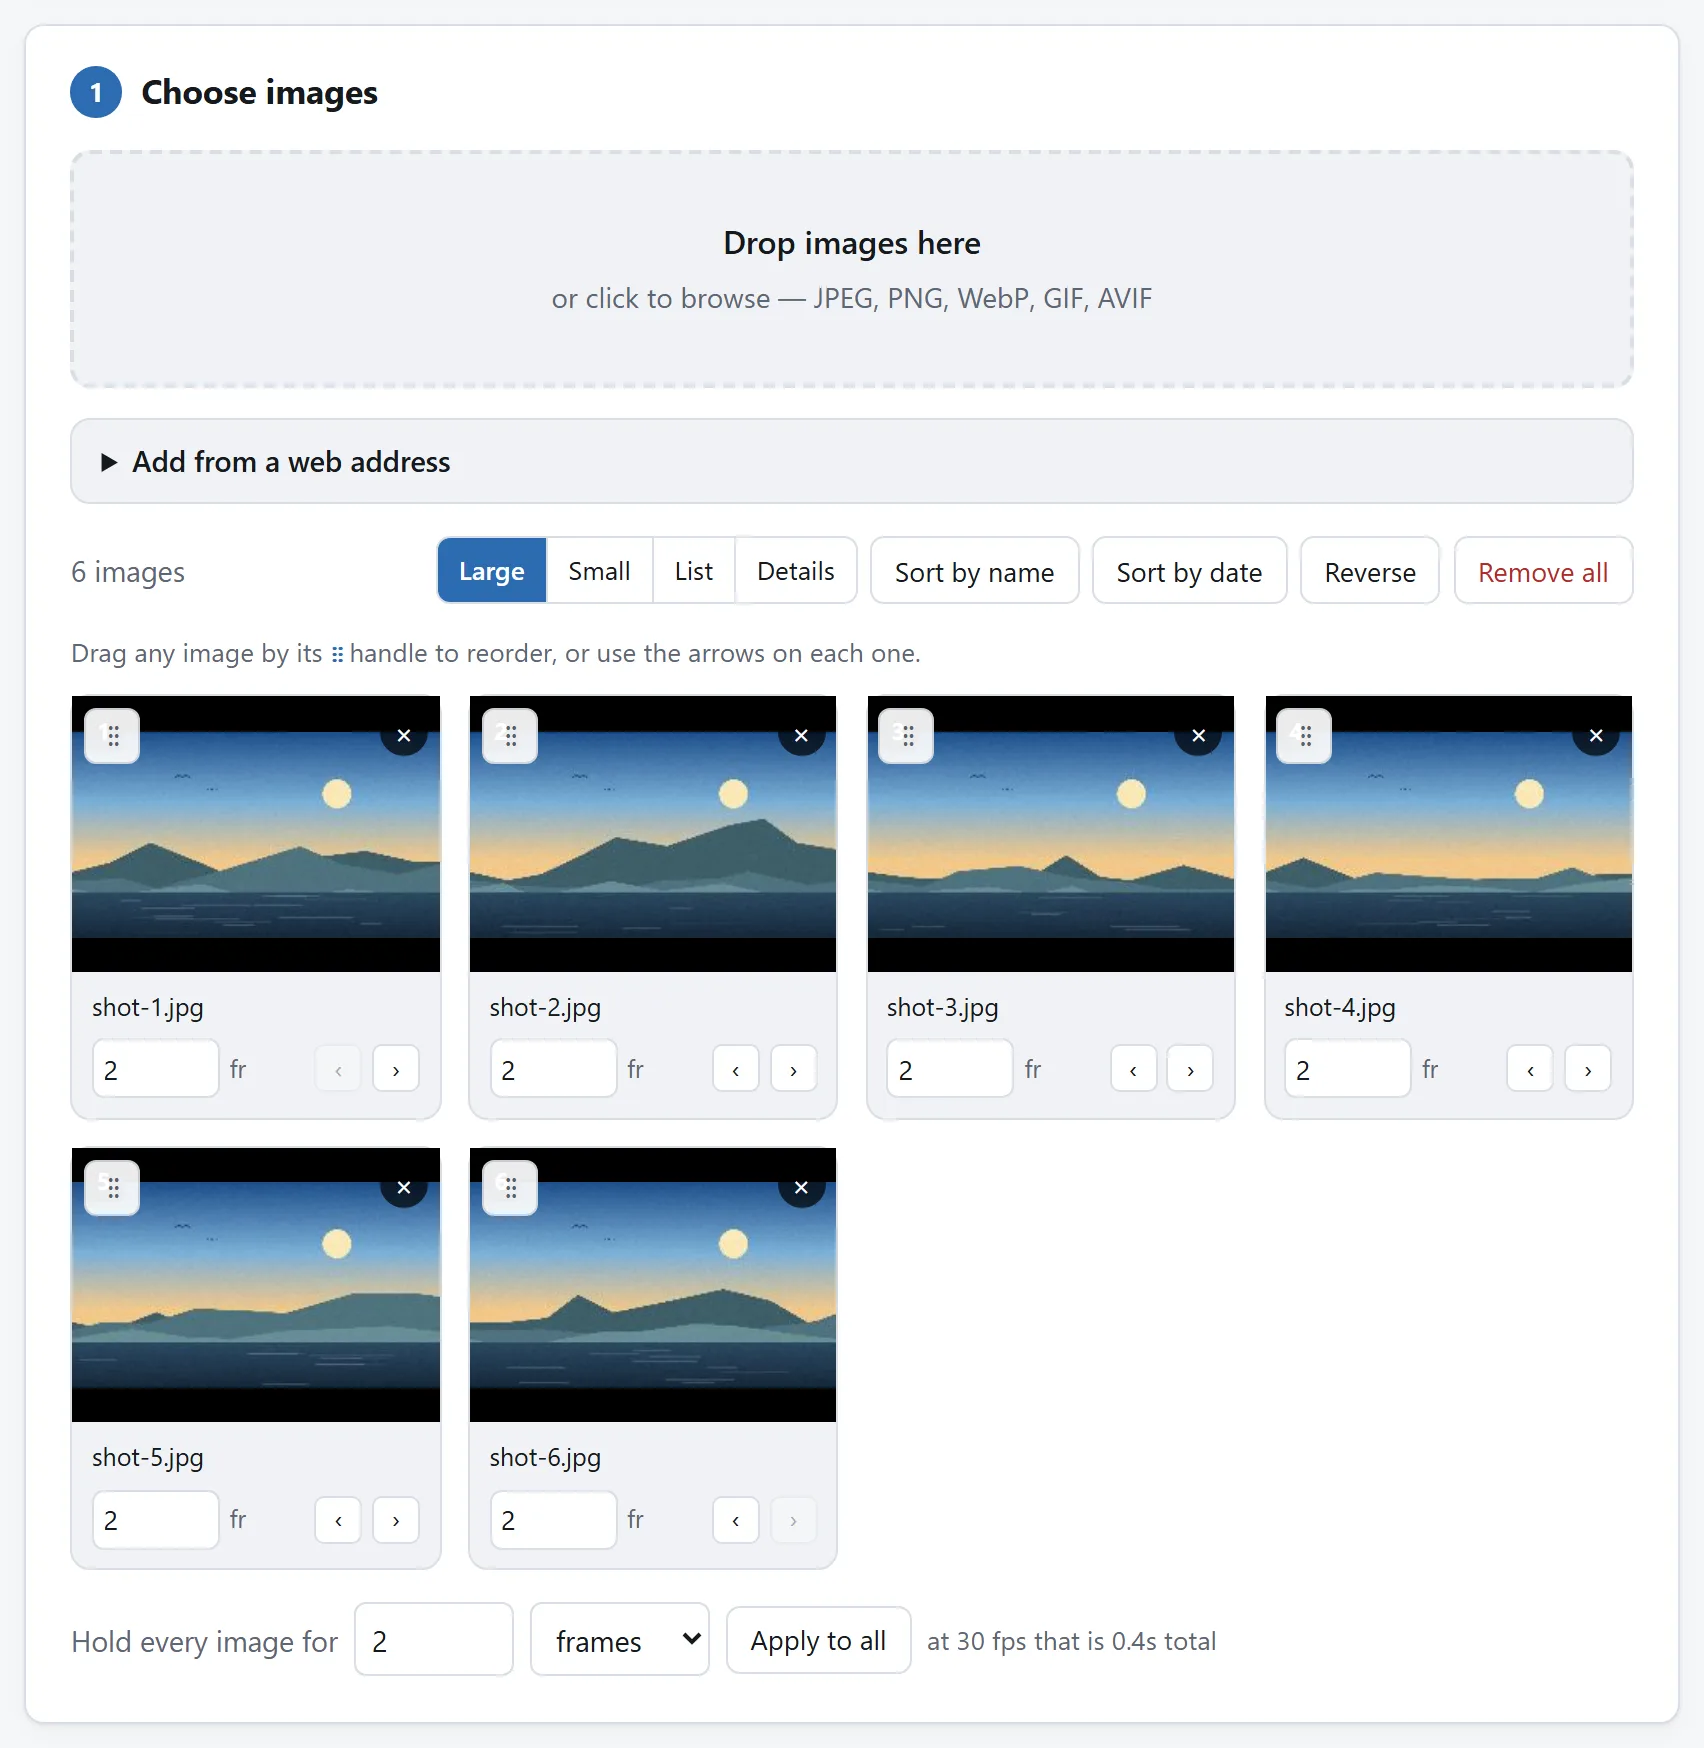
The order is the list, and the list is draggable. It is taken from the order you added them, which is not the order the file names imply.
## There is no soundtrack, and that is not a small thing
The MP4 this tool writes has a single video track and no audio track at all. If your slideshow needs music or narration, you will need a video editor for that step.
It is worth knowing why, rather than just that: adding audio means decoding a music file, encoding it to AAC, and interleaving it with the video in the container. All three are real work, and doing them badly produces a file that drifts out of sync as it plays. It is on the list rather than half-done.
A practical note if you do add music afterwards: pick the track first and set the per-picture duration so the slideshow comes out close to the length of the song. Trimming the music to fit the video always sounds worse than fitting the video to the music.
## What comes out, and what to do if it will not play
MP4 with H.264 is the target, and it is the most widely playable combination there is. The fallback records in real time, usually as WebM, which fewer editors and social platforms accept. Keep the tab visible during fallback recording: timing is approximate and images can be skipped if decoding falls behind. For an exact numbered sequence, use the MP4 encoder when your browser supports it.
If you end up with a WebM and something refuses it, try re-rendering the originals with MP4 selected in a browser whose WebCodecs encoder supports H.264 at your chosen dimensions. Re-rendering avoids the extra generation of lossy encoding that converting an already compressed video would add.
There is no fixed picture-count limit. The finished video is assembled in memory before you download it; MP4 exports must stay below 4 GiB (about 4.3 GB), and memory can run out well before that cap; the chosen dimensions must also be supported by your browser's encoder. A long 4K slideshow can hit those limits before the number of source images looks particularly large.
## Check the result before passing it on
If a slideshow flashes by, check that the hold unit is seconds and press Apply to all. If a render sequence plays too slowly, check both the frame rate and the per-image frame holds. Bars keep an image intact; missing edges usually mean Fill frame was selected. Re-export from the original stills when changing these choices.
To build an animation that needs to remain a GIF, use [GIF Maker](https://abox.tools/gif-maker/). To turn an existing GIF into video, use [GIF to MP4](https://abox.tools/gif-to-mp4/) directly, preserving the GIF's played frame timing. Extracting PNGs first makes timing a manual step; the [GIF extraction guide](https://abox.tools/guides/split-a-gif-into-frames/) explains when that extra step is useful.
## Making the file smaller
If the result is too large for wherever it is going, in order of what actually helps:
**Drop the frame rate.** For a still slideshow this costs nothing visible and is the largest single saving available.
**Drop the resolution.** 1080p instead of 4K is a quarter of the pixels, and on a phone screen nobody will know.
**Shorten it.** Three seconds a picture instead of five is 40% off the length and 40% off the file, and usually a better slideshow.
Shrinking the source photographs first does not help much. The video is encoded at the resolution you chose regardless, so a 4000-pixel photo and a 2000-pixel one produce almost the same number of bytes in a 1080p video. It does make the encoding quicker, and it moves that memory ceiling.
## Why this does not need a server, with one exception stated
Encoding video used to be the clearest case for uploading: browsers could not do it, and a machine with FFmpeg could. WebCodecs changed that by exposing the hardware encoder that is already in your machine, which is the same one your phone uses to record video in real time. Compositing the frames is a canvas. Neither step needs anything but your own hardware.
One exception on this particular tool, stated rather than buried: the optional “add from a web address” feature fetches an image from an address you paste in, and the server at that address sees your IP and what you asked for. That is inherent to the feature rather than a flaw in it, and it is the only network step anywhere in the tool. Do not use it and nothing leaves your machine at all.
[Is it safe to upload files to online converters?](https://abox.tools/guides/is-it-safe-to-upload-files/) sets out four checks that will tell you the same thing about any tool, including this one.
The short answer
Open Images to Video, drop the pictures in, put them in order, choose seconds for a slideshow or frames for an image sequence, set how long each one is held, and create the video. MP4 with H.264 is the recommended output; check it in the receiving app before sharing.
The two settings that most often need a second pass are the duration and the resolution, and they are worth understanding before the first render rather than after it.
A numbered render sequence to MP4
In Images to Video, add the still frames exported by Blender, After Effects or another renderer. Use an image format your browser can decode, such as PNG or JPG.
Choose Sort by name. The sort understands numbers, so frame_2 comes before frame_10. Check the list for missing frames or an unwanted restart in numbering.
Leave Hold every image for at one frame and set the frame rate to the render's rate. A sequence of 240 images at 24 fps lasts ten seconds.
Choose the output dimensions and Fit inside to preserve the whole image. Transparent areas become the selected backdrop: H.264 MP4 does not retain alpha.
Create the video, watch the beginning and end, then download it and open it in the app that will receive it.
A folder of timelapse photographs follows the same steps. Frame rate sets playback speed; Sort by date uses file modification time, so check the order if the photographs have been copied or edited. For an existing video clip, use Time-Lapse Maker instead.
A slideshow, stop motion or a record of progress
For holiday photos, an event recap or a product catalogue, switch Hold every image for to seconds, enter a hold such as three, and press Apply to all. Arrange the tiles into the story you want, choose 1080p or the destination's vertical shape, and use Fit inside when every part of a photograph matters. Check the total length before rendering, then watch the first, middle and last pictures in the finished video.
For stop motion, a render sequence or regularly spaced progress photographs, use frame holds instead: one image held for one frame at 24 fps gives 24 images a second. Sort by name and inspect the order before exporting. This tool writes hard cuts between stills, with no zoom, crossfade or soundtrack. A narrated presentation needs another editor for sound; a silent visual progress record can be complete here.
Frame rate and duration are not the same thing
This is the confusion that costs people a re-render.
Duration in seconds is how long each picture stays on screen. It is the setting you actually care about. Three seconds is a comfortable default for a slideshow somebody is watching; one to two seconds feels brisk; anything over five drags unless there is narration over it.
Frame rate, with seconds selected, is how many times a second the video repeats that picture. It changes nothing about what the slideshow looks like — a still image held for three seconds looks identical at 24 frames per second and at 60 — and it changes the file size and the encoding time quite a lot.
The tool starts with one frame per image. In that unit, frame rate does change the duration: 24 images at 24 fps last one second, while the same list at 12 fps lasts two. Switch to seconds for a plain slideshow; 24 or 30 fps is plenty. There are no pans, zooms or crossfades in this tool, so a higher rate adds no motion to a still.
With seconds selected, changing the frame rate changes the frame count while each image keeps its chosen duration. With frame holds, it changes the length too.
Resolution, and pictures of the wrong shape
A video has one frame size for its whole length. Your photographs almost certainly do not all share one, so something has to happen to the ones that do not fit — and that something is the choice worth making deliberately.
Start by picking the resolution from where the video is going:
1920×1080 for anything general. Universally supported, plays everywhere, and is what most people mean by HD.
1080×1920 — the same numbers the other way round — for a phone-first destination: stories, reels, shorts.
3840×2160 only if the pictures genuinely have that much detail and the destination will show it. It is four times the pixels, four times the encoding time, and roughly four times the file.
Then decide what happens to the mismatches. Fitting each picture inside the frame keeps all of it and leaves bars at the sides — safe, and the right answer when the pictures matter more than the presentation. Filling the frame and cropping the overflow looks better and will cut the top off some of them. Mixing portrait and landscape photographs in one video is the case where there is no good answer; deciding in advance which way you would rather be wrong saves a re-render.
Order, and the file-name trap
As with any batch job, file names sort in a way that is not the way you counted. photo2.jpg comes after photo10.jpg in an alphabetical sort, because the comparison is character by character.
Sort by name counts numeric filenames naturally, so photo2 comes before photo10 here. Sort by date uses the files' modification dates, not a guaranteed camera capture time; copied or edited photographs can therefore need manual reordering. Dragging the tiles is right for anything where the story is not chronological. Check before you render: the video is the one artefact where fixing the order means doing the whole job again.
The order is the list, and the list is draggable. It is taken from the order you added them, which is not the order the file names imply.
There is no soundtrack, and that is not a small thing
The MP4 this tool writes has a single video track and no audio track at all. If your slideshow needs music or narration, you will need a video editor for that step.
It is worth knowing why, rather than just that: adding audio means decoding a music file, encoding it to AAC, and interleaving it with the video in the container. All three are real work, and doing them badly produces a file that drifts out of sync as it plays. It is on the list rather than half-done.
A practical note if you do add music afterwards: pick the track first and set the per-picture duration so the slideshow comes out close to the length of the song. Trimming the music to fit the video always sounds worse than fitting the video to the music.
What comes out, and what to do if it will not play
MP4 with H.264 is the target, and it is the most widely playable combination there is. The fallback records in real time, usually as WebM, which fewer editors and social platforms accept. Keep the tab visible during fallback recording: timing is approximate and images can be skipped if decoding falls behind. For an exact numbered sequence, use the MP4 encoder when your browser supports it.
If you end up with a WebM and something refuses it, try re-rendering the originals with MP4 selected in a browser whose WebCodecs encoder supports H.264 at your chosen dimensions. Re-rendering avoids the extra generation of lossy encoding that converting an already compressed video would add.
There is no fixed picture-count limit. The finished video is assembled in memory before you download it; MP4 exports must stay below 4 GiB (about 4.3 GB), and memory can run out well before that cap; the chosen dimensions must also be supported by your browser's encoder. A long 4K slideshow can hit those limits before the number of source images looks particularly large.
Check the result before passing it on
If a slideshow flashes by, check that the hold unit is seconds and press Apply to all. If a render sequence plays too slowly, check both the frame rate and the per-image frame holds. Bars keep an image intact; missing edges usually mean Fill frame was selected. Re-export from the original stills when changing these choices.
To build an animation that needs to remain a GIF, use GIF Maker. To turn an existing GIF into video, use GIF to MP4 directly, preserving the GIF's played frame timing. Extracting PNGs first makes timing a manual step; the GIF extraction guide explains when that extra step is useful.
Making the file smaller
If the result is too large for wherever it is going, in order of what actually helps:
Drop the frame rate. For a still slideshow this costs nothing visible and is the largest single saving available.
Drop the resolution. 1080p instead of 4K is a quarter of the pixels, and on a phone screen nobody will know.
Shorten it. Three seconds a picture instead of five is 40% off the length and 40% off the file, and usually a better slideshow.
Shrinking the source photographs first does not help much. The video is encoded at the resolution you chose regardless, so a 4000-pixel photo and a 2000-pixel one produce almost the same number of bytes in a 1080p video. It does make the encoding quicker, and it moves that memory ceiling.
Why this does not need a server, with one exception stated
Encoding video used to be the clearest case for uploading: browsers could not do it, and a machine with FFmpeg could. WebCodecs changed that by exposing the hardware encoder that is already in your machine, which is the same one your phone uses to record video in real time. Compositing the frames is a canvas. Neither step needs anything but your own hardware.
One exception on this particular tool, stated rather than buried: the optional “add from a web address” feature fetches an image from an address you paste in, and the server at that address sees your IP and what you asked for. That is inherent to the feature rather than a flaw in it, and it is the only network step anywhere in the tool. Do not use it and nothing leaves your machine at all.

