A contact sheet, a side-by-side comparison, or a row of screenshots: the pictures need to become one file. The choices that matter are their order, the shape they fit into, and whether filling that shape is allowed to cut off an edge.
# How to arrange multiple images into one picture
A contact sheet, a side-by-side comparison, or a row of screenshots: the pictures need to become one file. The choices that matter are their order, the shape they fit into, and whether filling that shape is allowed to cut off an edge.
[Open the Image Layout](https://abox.tools/image-layout/): Put your pictures together. Keep them on your machine.
Last updated 8 October 2026
## Start with the arrangement
Open [Image Layout](https://abox.tools/image-layout/), choose the pictures, and put the tiles in the order you want. Drag them, or use the arrow buttons when a keyboard is easier. Remove any that do not belong before deciding how much space each one gets.
A **grid** suits a contact sheet or a collection that needs to fit on a screen. Its column count decides how many pictures go across before the next row begins. A **horizontal strip** suits a side-by-side comparison. A **vertical strip** suits a sequence of screenshots that somebody will read from top to bottom.
The presets give you a starting point: square cells, a contact sheet, horizontal or vertical strips, portrait cells, or a seamless grid with no gaps. Choose one, then adjust the ordinary controls if it needs a different width or more breathing room. A preset keeps your file name and each image's framing. If you have already zoomed or moved pictures, use **Reset all frames** to return them to their starting fit. The shape of the complete image still depends on how many pictures you give it; square cells do not make every collection a square output.
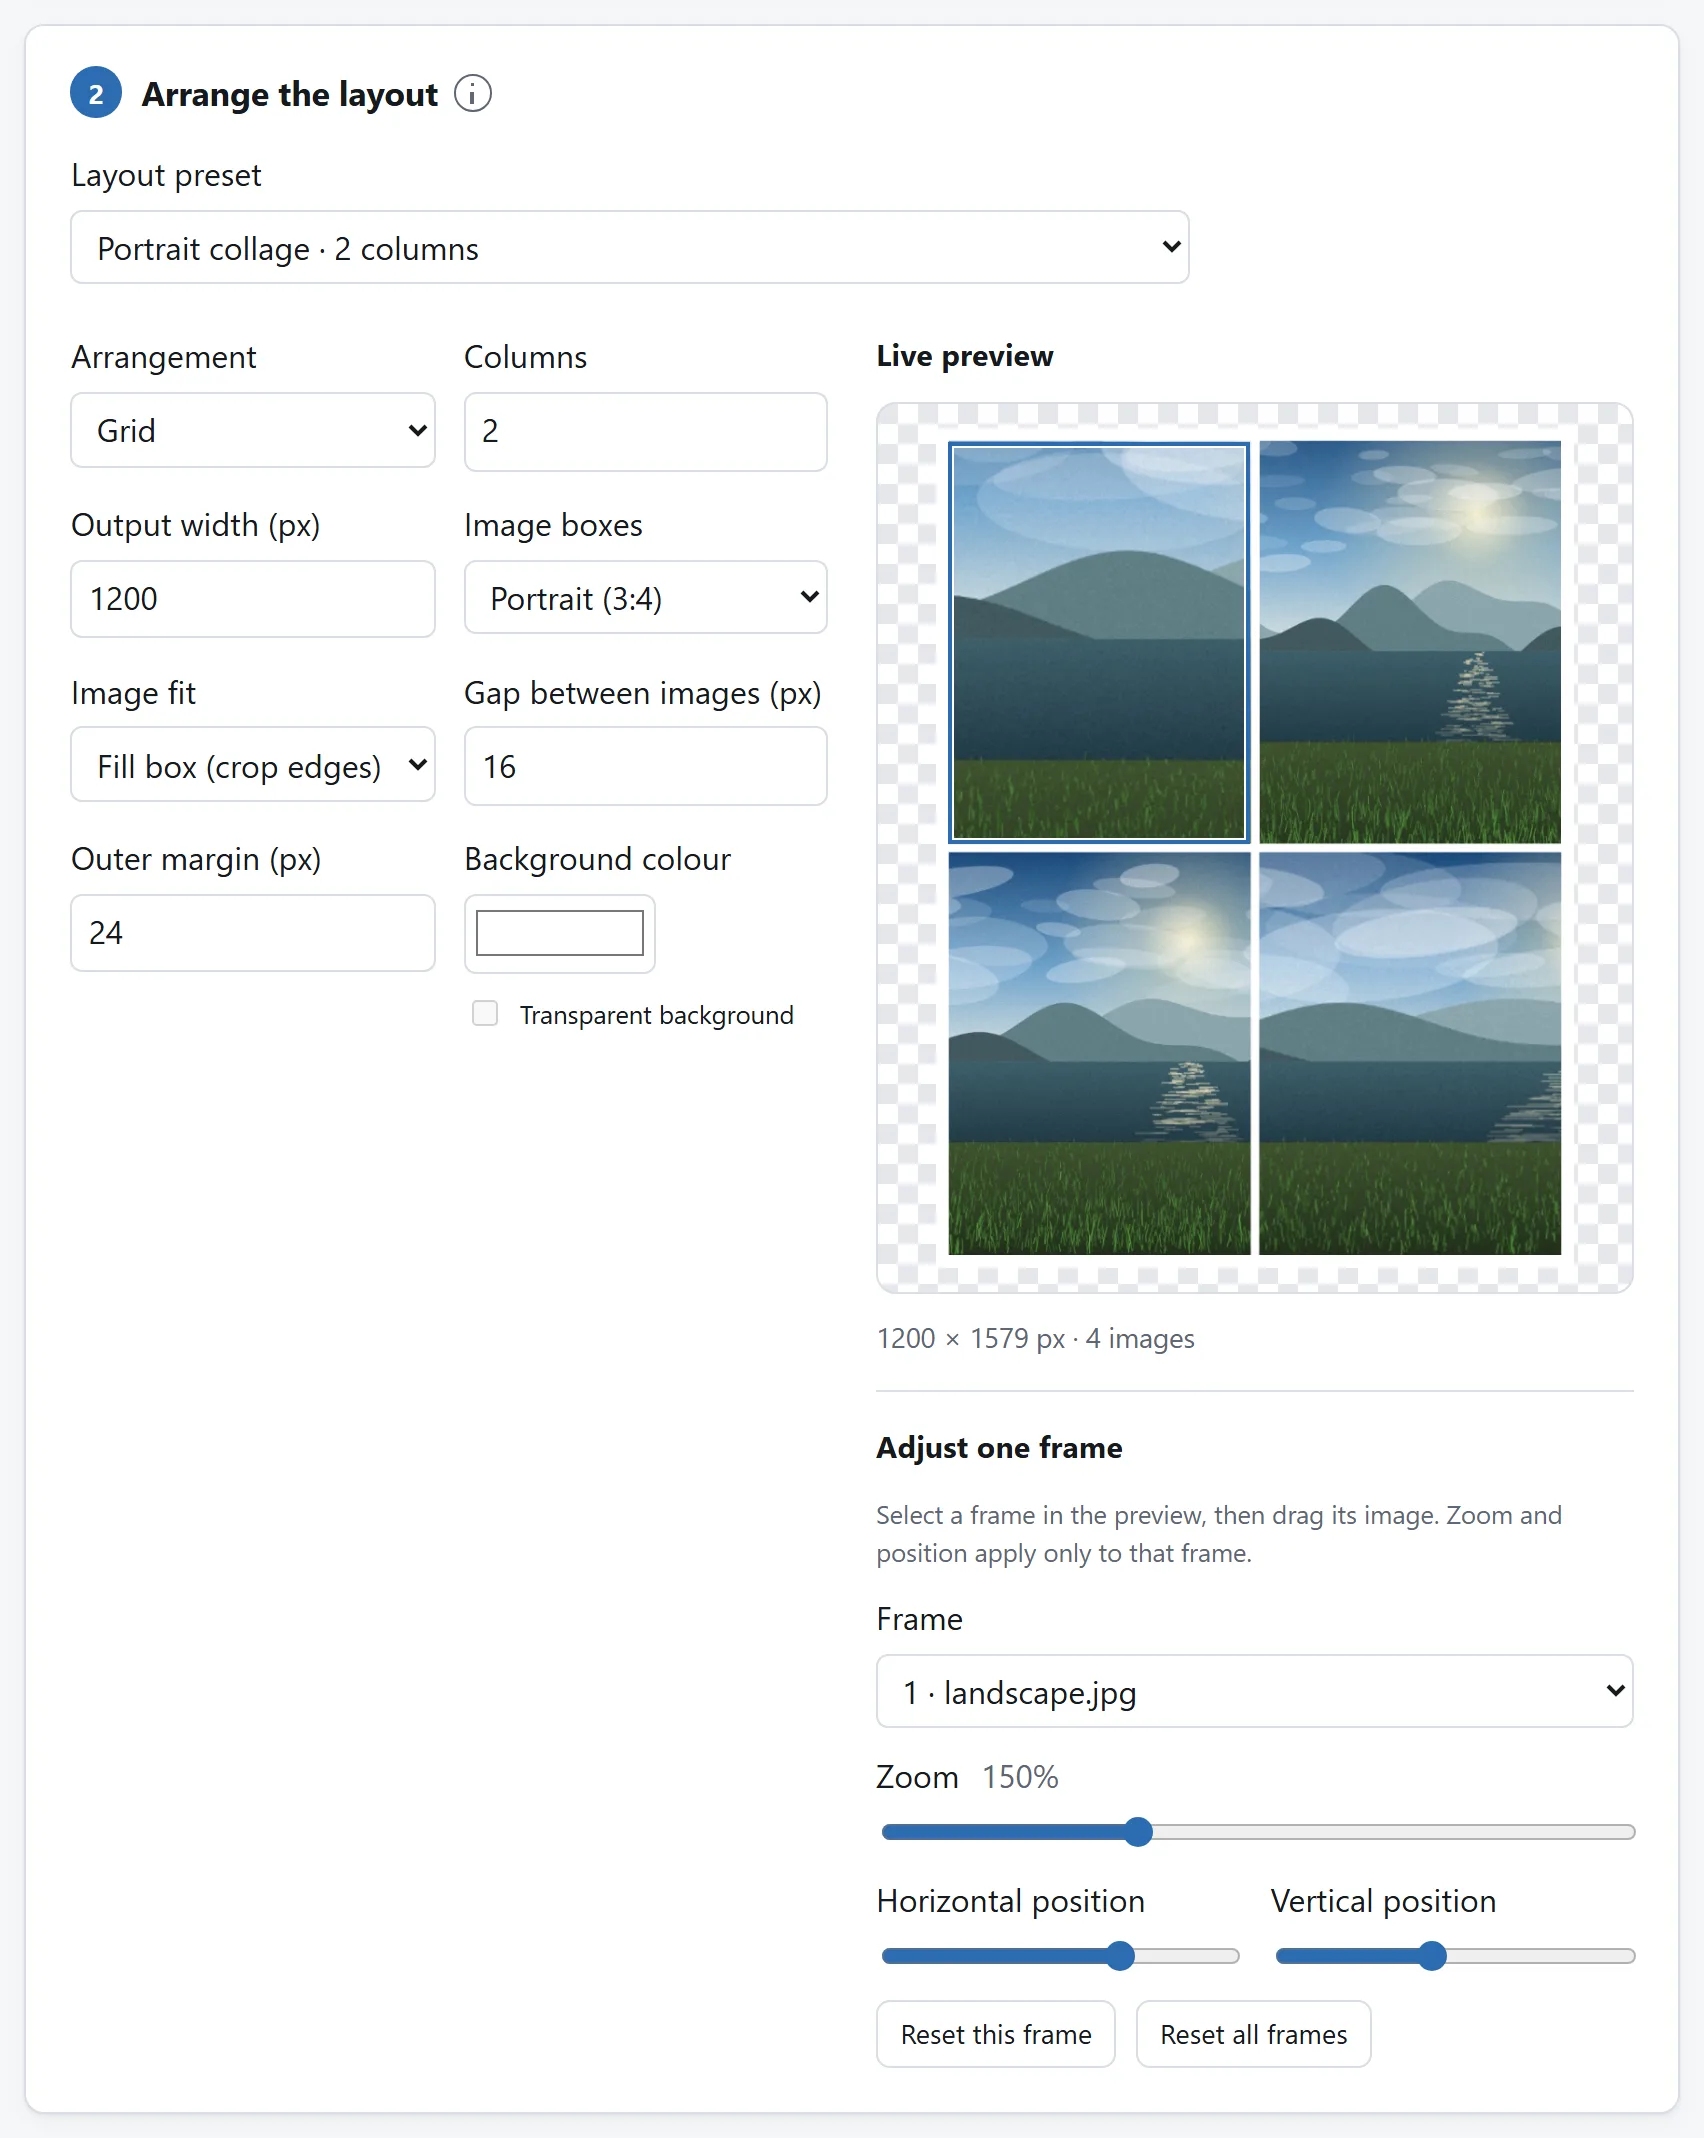
The preview uses the same placement and crop as the export. Change a column count or a gap here and you see where the pictures will land. The selected frame can be moved and zoomed on its own.
## A cell shape is also a decision about cropping
A square grid makes a collection look even, but a portrait photograph and a landscape screenshot cannot both fill a square and stay whole. There are two ways to handle that difference, and neither stretches the picture out of shape.
At 100% zoom, **Fit whole image** scales the picture until every edge fits inside its cell. The remaining space shows the background. Choose this for screenshots, diagrams and photographs whose edges matter.
**Fill box (crop edges)** scales the picture until the cell is full and starts by trimming the overflow around the centre. Choose this when an even grid matters more than keeping every edge, and check that a face or a caption has not been cut off.
In a strip, **Keep original shapes (strips)** gives each picture a cell with its own proportions. A horizontal strip gives the pictures a common height; a vertical strip gives them a common width. That is the choice for putting different-shaped pictures together without a crop or extra space inside their cells at 100% zoom.
## Move the picture inside its frame
A filled cell can crop off the thing you meant to show. Select the picture in the preview or choose it from **Frame**. Drag it to move the view, or use **Horizontal position** and **Vertical position**, then adjust **Zoom**. The controls provide the same adjustments by keyboard.
A position control is available when the picture and frame have different sizes on that axis. If the picture is smaller, move it through the unused space while keeping the whole picture inside the frame. If it is larger, move it to choose which part is visible. This also lets you position a picture after zooming out, instead of leaving it in the centre.
Each picture keeps its own framing, even when you move its tile to a different place. Its neighbours keep theirs. Use **Reset this frame** to return the selected picture to its starting position and 100% zoom. **Reset all frames** restores every picture. Then check the full layout again.
The selected fit is the starting point at 100% zoom. You can zoom from 25% to 400%: below 100%, the picture shrinks inside its cell and shows more background; zooming in enlarges it and can crop its edges. Enlargement cannot add detail that was never there, so a small image may become soft when it is zoomed tightly. The preview and the download use the same framing; inspect the finished file for sharpness.
## Choose the size for the finished picture
The width control is the width of the whole output, including its outer padding and the gaps between pictures. In a grid, more columns divide that width into smaller cells. If eight photographs need to be inspected closely, a very small output width will make each photograph too small regardless of how large the originals were.
Export reads the original images rather than enlarging the little copies used by the live preview. That keeps source detail available, but making a small source larger still cannot invent detail. View the downloaded file at its normal size before deciding whether it is sharp enough.
The canvas is limited to **8192 pixels on either side** and **32 megapixels in total**. A vertical strip of twenty tall screenshots can hit the height limit before its width looks excessive. Lower the width, use a grid with more columns, or make several layouts when the page reports that the result is too large.
## Gap, padding and background do different jobs
**Gap** is the space between neighbours. **Outer margin** is the space between the pictures and the outside edge. A small gap can make separate screenshots easier to read; padding keeps the first and last pictures from touching the frame.
The background colour fills those spaces and the bands around a picture shown whole in a cell. Turn on transparency with PNG or WebP if the layout needs to sit over another background. JPEG always has a solid background, because its format has nowhere to store transparency.
## Pick the format after checking the crop
**PNG** suits text, diagrams, screenshots and a layout that needs sharp edges or transparency. It preserves the pixels of the finished canvas, but a collage of photographs can make a large file.
**JPEG** suits photographs and forms that ask for a JPG. Its quality control trades detail for file size, so check small text and fine edges if the layout includes screenshots. Transparent parts are filled with your chosen background colour.
**WebP** can give a smaller image while keeping transparency. Its quality setting also trades detail for size. The page checks whether the browser can write it and disables the choice if it cannot.
Create the image, then download the finished file. If an export is taking longer than you want, Cancel stops between pictures; the browser may need to finish the image it is currently decoding first.
## What a layout keeps, and what it changes
The result is one still image. An animated GIF, WebP or AVIF contributes the first frame the browser decodes. If you want separate GIF frames in a contact sheet, use [GIF Splitter](https://abox.tools/split-gif/) first, then arrange those still images.
Drawing onto a browser canvas makes an 8-bit SDR image. Resizing changes pixels, partly transparent colours can shift, and wide-gamut colour or HDR may change. Source EXIF, GPS, camera and date tags are not copied into the result. Keep the originals as well if you need to preserve the files exactly as they came from the camera or another application.
The layout is made on your own machine, and nothing overwrites the source files. There is no upload or remote image import. After the page has loaded, disconnecting from the network leaves the picker, preview and export working, which is a check you can make with your own pictures.
Start with the arrangement
Open Image Layout, choose the pictures, and put the tiles in the order you want. Drag them, or use the arrow buttons when a keyboard is easier. Remove any that do not belong before deciding how much space each one gets.
A grid suits a contact sheet or a collection that needs to fit on a screen. Its column count decides how many pictures go across before the next row begins. A horizontal strip suits a side-by-side comparison. A vertical strip suits a sequence of screenshots that somebody will read from top to bottom.
The presets give you a starting point: square cells, a contact sheet, horizontal or vertical strips, portrait cells, or a seamless grid with no gaps. Choose one, then adjust the ordinary controls if it needs a different width or more breathing room. A preset keeps your file name and each image's framing. If you have already zoomed or moved pictures, use Reset all frames to return them to their starting fit. The shape of the complete image still depends on how many pictures you give it; square cells do not make every collection a square output.
The preview uses the same placement and crop as the export. Change a column count or a gap here and you see where the pictures will land. The selected frame can be moved and zoomed on its own.
A cell shape is also a decision about cropping
A square grid makes a collection look even, but a portrait photograph and a landscape screenshot cannot both fill a square and stay whole. There are two ways to handle that difference, and neither stretches the picture out of shape.
At 100% zoom, Fit whole image scales the picture until every edge fits inside its cell. The remaining space shows the background. Choose this for screenshots, diagrams and photographs whose edges matter.
Fill box (crop edges) scales the picture until the cell is full and starts by trimming the overflow around the centre. Choose this when an even grid matters more than keeping every edge, and check that a face or a caption has not been cut off.
In a strip, Keep original shapes (strips) gives each picture a cell with its own proportions. A horizontal strip gives the pictures a common height; a vertical strip gives them a common width. That is the choice for putting different-shaped pictures together without a crop or extra space inside their cells at 100% zoom.
Move the picture inside its frame
A filled cell can crop off the thing you meant to show. Select the picture in the preview or choose it from Frame. Drag it to move the view, or use Horizontal position and Vertical position, then adjust Zoom. The controls provide the same adjustments by keyboard.
A position control is available when the picture and frame have different sizes on that axis. If the picture is smaller, move it through the unused space while keeping the whole picture inside the frame. If it is larger, move it to choose which part is visible. This also lets you position a picture after zooming out, instead of leaving it in the centre.
Each picture keeps its own framing, even when you move its tile to a different place. Its neighbours keep theirs. Use Reset this frame to return the selected picture to its starting position and 100% zoom. Reset all frames restores every picture. Then check the full layout again.
The selected fit is the starting point at 100% zoom. You can zoom from 25% to 400%: below 100%, the picture shrinks inside its cell and shows more background; zooming in enlarges it and can crop its edges. Enlargement cannot add detail that was never there, so a small image may become soft when it is zoomed tightly. The preview and the download use the same framing; inspect the finished file for sharpness.
Choose the size for the finished picture
The width control is the width of the whole output, including its outer padding and the gaps between pictures. In a grid, more columns divide that width into smaller cells. If eight photographs need to be inspected closely, a very small output width will make each photograph too small regardless of how large the originals were.
Export reads the original images rather than enlarging the little copies used by the live preview. That keeps source detail available, but making a small source larger still cannot invent detail. View the downloaded file at its normal size before deciding whether it is sharp enough.
The canvas is limited to 8192 pixels on either side and 32 megapixels in total. A vertical strip of twenty tall screenshots can hit the height limit before its width looks excessive. Lower the width, use a grid with more columns, or make several layouts when the page reports that the result is too large.
Gap, padding and background do different jobs
Gap is the space between neighbours. Outer margin is the space between the pictures and the outside edge. A small gap can make separate screenshots easier to read; padding keeps the first and last pictures from touching the frame.
The background colour fills those spaces and the bands around a picture shown whole in a cell. Turn on transparency with PNG or WebP if the layout needs to sit over another background. JPEG always has a solid background, because its format has nowhere to store transparency.
Pick the format after checking the crop
PNG suits text, diagrams, screenshots and a layout that needs sharp edges or transparency. It preserves the pixels of the finished canvas, but a collage of photographs can make a large file.
JPEG suits photographs and forms that ask for a JPG. Its quality control trades detail for file size, so check small text and fine edges if the layout includes screenshots. Transparent parts are filled with your chosen background colour.
WebP can give a smaller image while keeping transparency. Its quality setting also trades detail for size. The page checks whether the browser can write it and disables the choice if it cannot.
Create the image, then download the finished file. If an export is taking longer than you want, Cancel stops between pictures; the browser may need to finish the image it is currently decoding first.
What a layout keeps, and what it changes
The result is one still image. An animated GIF, WebP or AVIF contributes the first frame the browser decodes. If you want separate GIF frames in a contact sheet, use GIF Splitter first, then arrange those still images.
Drawing onto a browser canvas makes an 8-bit SDR image. Resizing changes pixels, partly transparent colours can shift, and wide-gamut colour or HDR may change. Source EXIF, GPS, camera and date tags are not copied into the result. Keep the originals as well if you need to preserve the files exactly as they came from the camera or another application.
The layout is made on your own machine, and nothing overwrites the source files. There is no upload or remote image import. After the page has loaded, disconnecting from the network leaves the picker, preview and export working, which is a check you can make with your own pictures.
