An audio cut can land on the exact instant you marked, in every player, always — which is not true of video. This explains why, what the one real catch is, and what to do about it.
Open the Audio TrimmerMark the parts worth keeping as it plays. Get them back as one file, cut where you said.
# How to trim audio without losing quality
An audio cut can land on the exact instant you marked, in every player, always — which is not true of video. This explains why, what the one real catch is, and what to do about it.
[Open the Audio Trimmer](https://abox.tools/trim-audio/): Mark the parts worth keeping as it plays. Get them back as one file, cut where you said.
Last updated 26 August 2026
## The short answer
Open the [Audio Trimmer](https://abox.tools/trim-audio/), drop the recording in, press `I` and `O` to mark each part you want — as many as you like — and export. Every cut lands on the exact sample you marked, the kept samples come out as they went in, and the joins get a five-millisecond fade so they cannot click.
That is the whole job. The rest of this page is about why the exactness is real rather than a marketing claim, and about the one thing that does go wrong when you join two pieces of sound together.
## Why an audio cut can be exact when a video cut cannot
Video is not stored as a sequence of complete pictures — that would be enormous. Most frames are stored as a description of how they differ from their neighbours, so they cannot be decoded on their own. Only a **keyframe** stands alone, and keyframes are typically one to ten seconds apart. A trimmer that copies frames therefore cannot start wherever you like: it has to begin at a keyframe, which is why a trimmed video sometimes starts a second or two before your mark. [The video guide](https://abox.tools/guides/trim-a-video/) is mostly about that.
Sound has no equivalent. Once a recording is decoded it is a run of numbers — one per channel, tens of thousands of times a second — and every one of them stands entirely on its own. Sample 1,234,567 does not need sample 1,234,566 to be meaningful. So a cut can be made at any sample at all, and "exactly where you marked" means exactly that: your mark in seconds, multiplied by the sample rate, rounded to the nearest whole sample. At 48 kHz that rounding is at most ten microseconds.
There is no player-dependent behaviour to worry about either. A trimmed video relies on an edit mark that most players honour and some ignore; a trimmed WAV is just the samples, so there is nothing left for a player to disagree about.
## The catch: a join is a discontinuity
Here is the thing that actually goes wrong when you trim audio, and the reason a good trimmer has a setting for it.
Sound is a wave. When you cut from the middle of one word straight to the middle of another, the sample at the end of the first piece and the sample at the start of the second have no relationship at all: the waveform can jump from near the top of its range to near the bottom in a single sample. A speaker cone asked to make that jump makes the sharpest sound it is capable of, which you hear as a **click** or a tick at the join.
This has nothing to do with quality loss or with the format. It happens with a perfectly lossless cut of a perfectly clean recording. It is simply what a discontinuity sounds like. A trimmer that cuts on the exact sample and does nothing else will click at some joins and not at others, entirely depending on where in the waveform the two ends happened to land.
## What a five-millisecond fade is really doing
The fix is to bring the level down to silence just before the cut and back up just after it, so there is no jump left to make. That is all a “fade” is here: a ramp applied to a few hundred samples at each edge.
The length is the interesting part. Five milliseconds is about two hundred and forty samples at 48 kHz. That is long enough for the cone to travel — the click is gone completely — and far too short to be heard as a fade: five milliseconds is roughly a fifth of the time it takes to say a single consonant. You will not perceive the level moving. You will only perceive that the join is clean.
Longer fades are offered because some material wants them. Twenty or fifty milliseconds is worth reaching for when you are joining music, where the thing being interrupted is a sustained note rather than a syllable and the shortest ramp can still leave an audible pop. Speech almost never needs more than five.
A fade only belongs at an edge that is *actually* a cut. If a part begins at the very start of the recording, nothing was removed in front of it — the file began there before anything was trimmed — so fading it in would be an edit nobody asked for. The tool here places fades only where a join exists, which is why trimming nothing at all leaves every sample untouched.
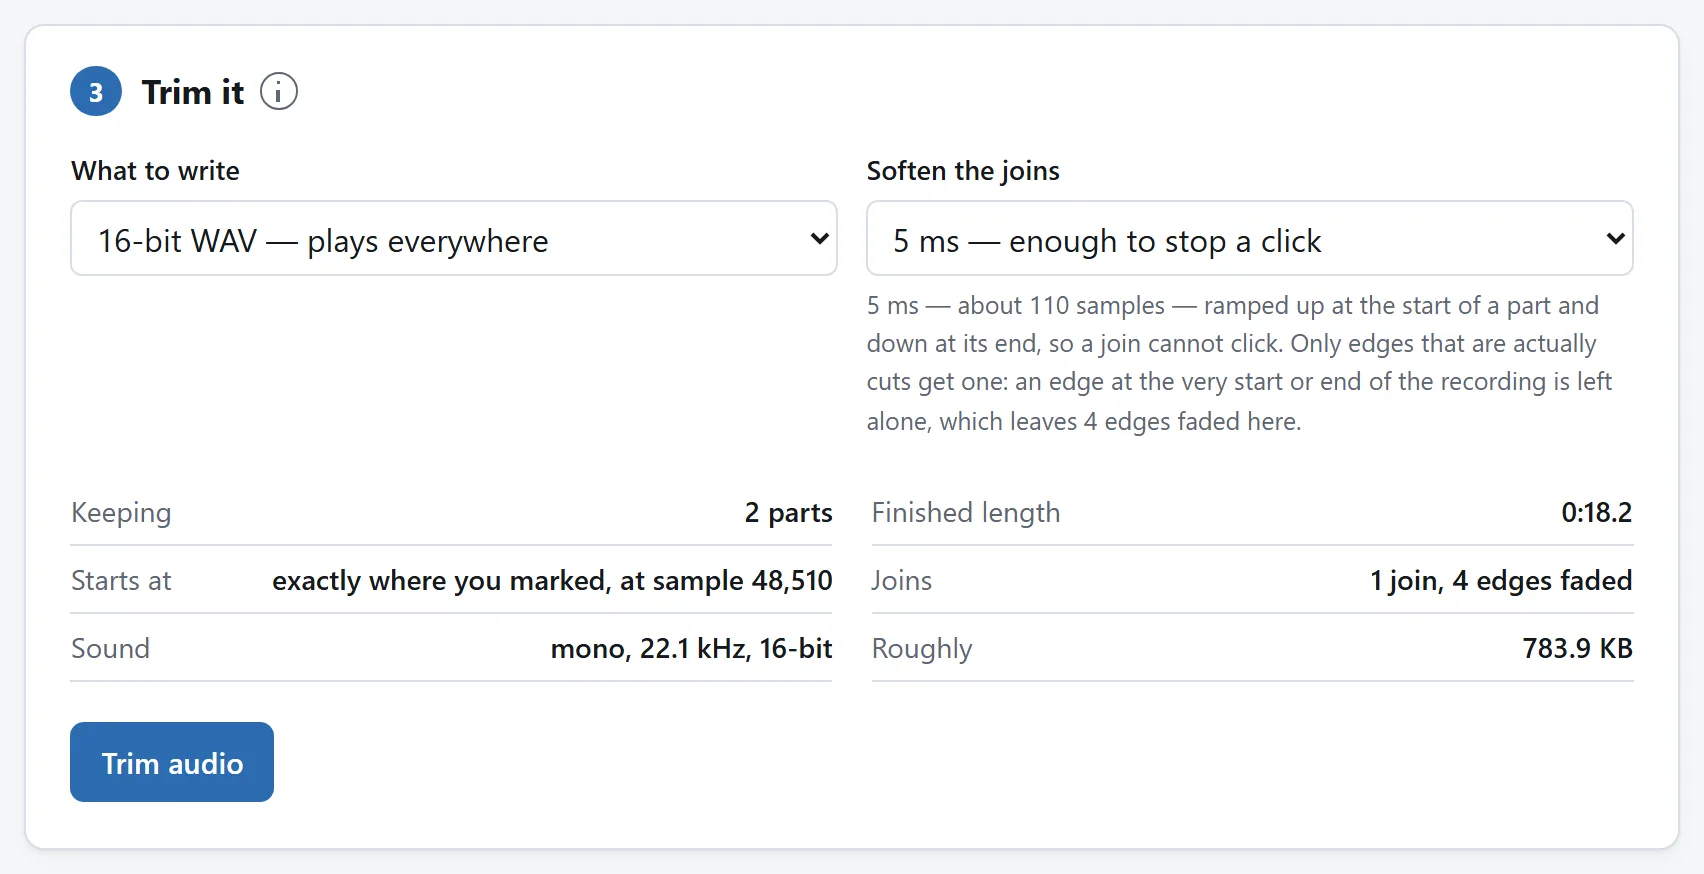
The fade is only applied at a join, which is the detail that matters: a fade at the start of a recording would be a change nobody asked for.
## Trimming an MP3, and why what comes out is a WAV
You can open an MP3, an M4A, an Ogg or an Opus file and trim it. What comes back is a WAV, and it is worth being clear about the trade that represents rather than presenting it as a feature.
There are two ways to trim compressed audio. One is to cut the compressed data directly, moving whole encoded frames into a new file without decoding them. That keeps the file small and costs no quality — but an MP3 frame is about twenty-six milliseconds long, so every cut is rounded to the nearest frame boundary, which is the audio version of the keyframe problem. It is also format-specific work: an MP3 reader trims no Opus files.
The other way is to decode, cut on the exact sample, and write the samples out. Nothing rounds, every format the browser can play works the same way, and the fades are possible at all — you cannot ramp a level you have not decoded. The cost is that the samples have to be written back out in some format, and no browser ships an MP3 or AAC encoder that can be used here. A WAV needs no encoder: it is the samples with a short header in front, so that step cannot lose anything.
The practical consequences: what comes out is much larger than what went in — roughly ten megabytes a minute in stereo — and it is not *better* than the MP3 it came from, because the compression that already happened cannot be undone. Everything opens a WAV, and anything that needs an MP3 can make one from it in one step.
## Marking several parts at once
Most online trimmers give you one pair of handles and ask which single stretch to keep. That answers the wrong question for most real recordings. An hour of interview does not have one good part; it has six, scattered through, and you find them by listening to it once.
So mark as you listen: `I` where a part starts, `O` where it ends, as many times as you like. Each pair becomes a row you can retime or reorder, and a band drawn on the waveform. The finished file is those rows joined in order.
The same list of marks answers the opposite question too. If what you want gone is the ums, the phone ringing and the false starts, mark *those* and switch to “cut them out” — everything you did not mark is joined up instead. It is the same marks either way, so you can flip between the two and watch the finished length change without marking anything twice.
Marking is careful work, and a closed tab should not cost it, so the marks save as a plain text file and load back. The layout is the one the [video cutter](https://abox.tools/trim-video/) writes, which means marks made against a video can be dropped onto its extracted audio and the other way round.
## Look at the waveform
Marking sound by scrubbing is guesswork; marking it by eye is not. Silence looks like silence, a cough looks like a cough, and the four seconds of room tone before somebody starts talking are visible immediately instead of having to be found.
This matters most for the marks that people get slightly wrong: the start of a sentence usually wants to sit in the silence *before* the breath, not after it, and the end usually wants a beat of room tone rather than a cut on the final consonant. Both are obvious in the picture and almost impossible to hit by ear alone. Drag the ends of a marked part along the waveform to nudge them.
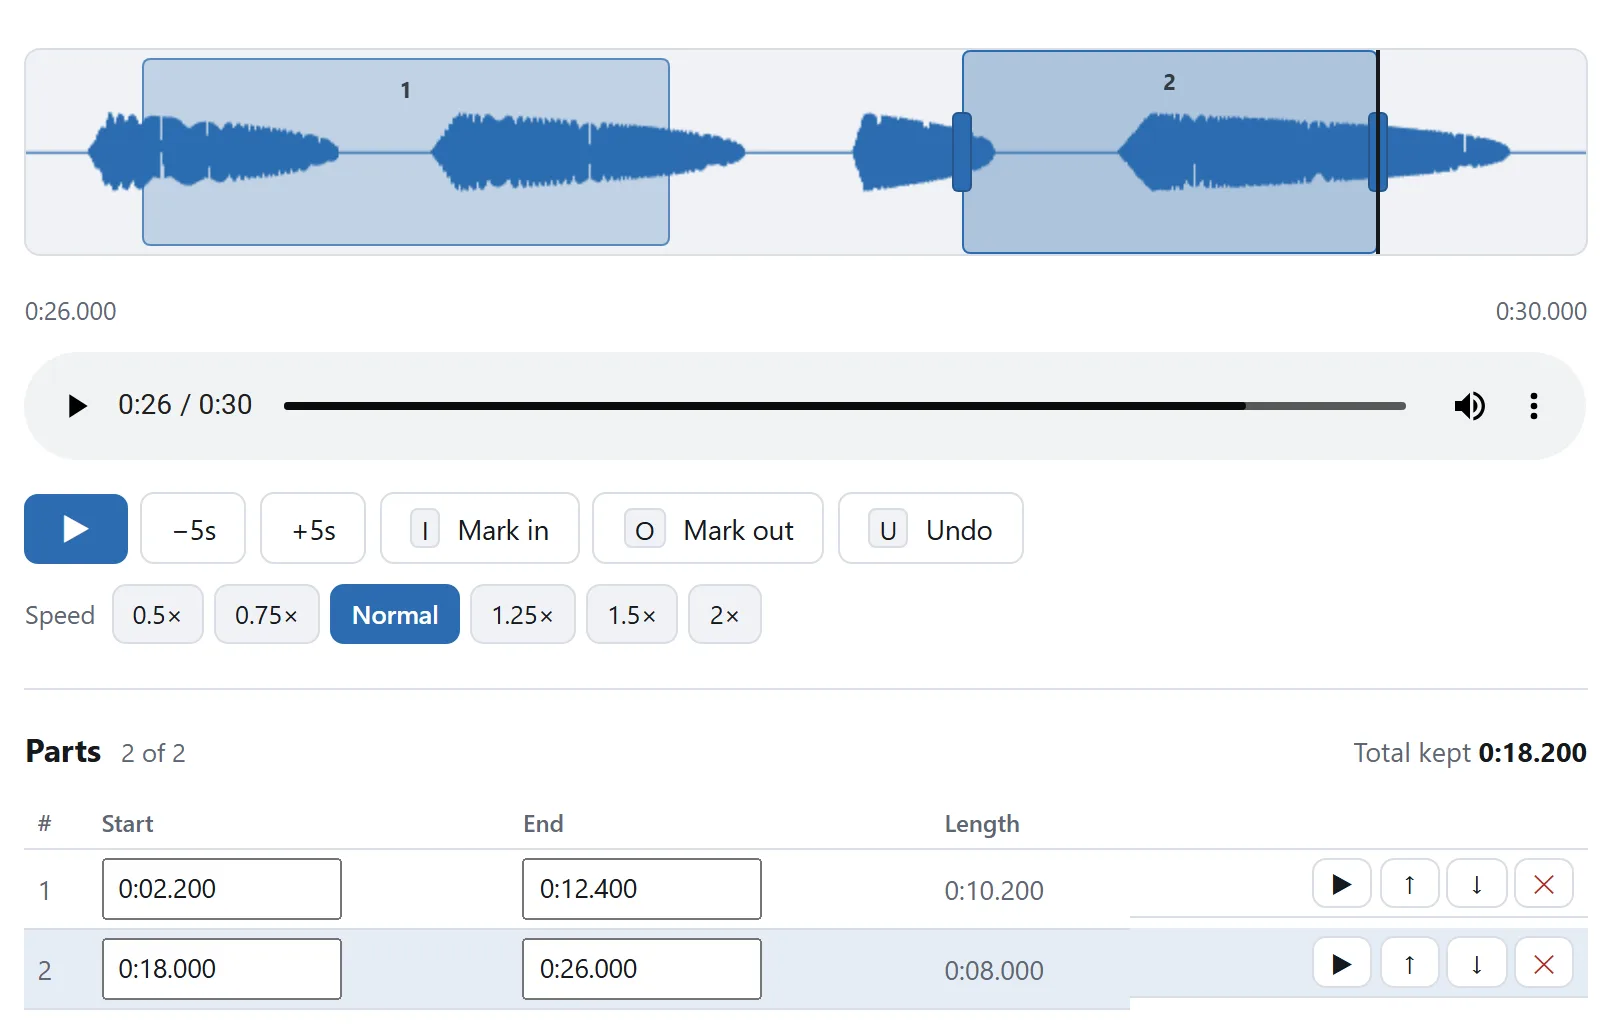
The gaps are where somebody stopped talking. That is what makes a waveform worth looking at rather than a stopwatch.
## Trimming is not fading, and it is not editing
Three words that get used for each other. Trimming changes which parts of the recording survive. A fade — the musical kind, over seconds — is a deliberate effect on the level, and the few milliseconds described above are not that; they are click removal that happens to use the same arithmetic.
If what you want is the recording played backwards, sped up, slowed down without the pitch moving, or brought up because it was recorded too quiet, that is the [Audio Editor](https://abox.tools/edit-audio/). It is the same decoder and the same WAV writer; it just does different arithmetic in between.
## Why this does not need an upload
Trimming is arithmetic over an array. The browser already has a decoder — it is the same one that plays the file in an `<audio>` element — and once the samples are decoded, keeping some of them and dropping the rest is a copy. There is no step in that description that a server could do better, and a round trip to one would be the slowest part of the whole job.
It is also a file type where uploading costs more than people think. Recordings are voices: interviews, lectures, calls, voice notes, therapy sessions, a child saying something you want to keep. The tool here has no network feature of any kind, and the page's `Content-Security-Policy` names every address it may contact, none of which belongs to this site.
Unplug from the internet and trim a recording anyway if you would rather check than be told. [Is it safe to upload files to online converters?](https://abox.tools/guides/is-it-safe-to-upload-files/) sets out three more checks like it.
The short answer
Open the Audio Trimmer, drop the recording in, press I and O to mark each part you want — as many as you like — and export. Every cut lands on the exact sample you marked, the kept samples come out as they went in, and the joins get a five-millisecond fade so they cannot click.
That is the whole job. The rest of this page is about why the exactness is real rather than a marketing claim, and about the one thing that does go wrong when you join two pieces of sound together.
Why an audio cut can be exact when a video cut cannot
Video is not stored as a sequence of complete pictures — that would be enormous. Most frames are stored as a description of how they differ from their neighbours, so they cannot be decoded on their own. Only a keyframe stands alone, and keyframes are typically one to ten seconds apart. A trimmer that copies frames therefore cannot start wherever you like: it has to begin at a keyframe, which is why a trimmed video sometimes starts a second or two before your mark. The video guide is mostly about that.
Sound has no equivalent. Once a recording is decoded it is a run of numbers — one per channel, tens of thousands of times a second — and every one of them stands entirely on its own. Sample 1,234,567 does not need sample 1,234,566 to be meaningful. So a cut can be made at any sample at all, and "exactly where you marked" means exactly that: your mark in seconds, multiplied by the sample rate, rounded to the nearest whole sample. At 48 kHz that rounding is at most ten microseconds.
There is no player-dependent behaviour to worry about either. A trimmed video relies on an edit mark that most players honour and some ignore; a trimmed WAV is just the samples, so there is nothing left for a player to disagree about.
The catch: a join is a discontinuity
Here is the thing that actually goes wrong when you trim audio, and the reason a good trimmer has a setting for it.
Sound is a wave. When you cut from the middle of one word straight to the middle of another, the sample at the end of the first piece and the sample at the start of the second have no relationship at all: the waveform can jump from near the top of its range to near the bottom in a single sample. A speaker cone asked to make that jump makes the sharpest sound it is capable of, which you hear as a click or a tick at the join.
This has nothing to do with quality loss or with the format. It happens with a perfectly lossless cut of a perfectly clean recording. It is simply what a discontinuity sounds like. A trimmer that cuts on the exact sample and does nothing else will click at some joins and not at others, entirely depending on where in the waveform the two ends happened to land.
What a five-millisecond fade is really doing
The fix is to bring the level down to silence just before the cut and back up just after it, so there is no jump left to make. That is all a “fade” is here: a ramp applied to a few hundred samples at each edge.
The length is the interesting part. Five milliseconds is about two hundred and forty samples at 48 kHz. That is long enough for the cone to travel — the click is gone completely — and far too short to be heard as a fade: five milliseconds is roughly a fifth of the time it takes to say a single consonant. You will not perceive the level moving. You will only perceive that the join is clean.
Longer fades are offered because some material wants them. Twenty or fifty milliseconds is worth reaching for when you are joining music, where the thing being interrupted is a sustained note rather than a syllable and the shortest ramp can still leave an audible pop. Speech almost never needs more than five.
A fade only belongs at an edge that is actually a cut. If a part begins at the very start of the recording, nothing was removed in front of it — the file began there before anything was trimmed — so fading it in would be an edit nobody asked for. The tool here places fades only where a join exists, which is why trimming nothing at all leaves every sample untouched.
The fade is only applied at a join, which is the detail that matters: a fade at the start of a recording would be a change nobody asked for.
Trimming an MP3, and why what comes out is a WAV
You can open an MP3, an M4A, an Ogg or an Opus file and trim it. What comes back is a WAV, and it is worth being clear about the trade that represents rather than presenting it as a feature.
There are two ways to trim compressed audio. One is to cut the compressed data directly, moving whole encoded frames into a new file without decoding them. That keeps the file small and costs no quality — but an MP3 frame is about twenty-six milliseconds long, so every cut is rounded to the nearest frame boundary, which is the audio version of the keyframe problem. It is also format-specific work: an MP3 reader trims no Opus files.
The other way is to decode, cut on the exact sample, and write the samples out. Nothing rounds, every format the browser can play works the same way, and the fades are possible at all — you cannot ramp a level you have not decoded. The cost is that the samples have to be written back out in some format, and no browser ships an MP3 or AAC encoder that can be used here. A WAV needs no encoder: it is the samples with a short header in front, so that step cannot lose anything.
The practical consequences: what comes out is much larger than what went in — roughly ten megabytes a minute in stereo — and it is not better than the MP3 it came from, because the compression that already happened cannot be undone. Everything opens a WAV, and anything that needs an MP3 can make one from it in one step.
Marking several parts at once
Most online trimmers give you one pair of handles and ask which single stretch to keep. That answers the wrong question for most real recordings. An hour of interview does not have one good part; it has six, scattered through, and you find them by listening to it once.
So mark as you listen: I where a part starts, O where it ends, as many times as you like. Each pair becomes a row you can retime or reorder, and a band drawn on the waveform. The finished file is those rows joined in order.
The same list of marks answers the opposite question too. If what you want gone is the ums, the phone ringing and the false starts, mark those and switch to “cut them out” — everything you did not mark is joined up instead. It is the same marks either way, so you can flip between the two and watch the finished length change without marking anything twice.
Marking is careful work, and a closed tab should not cost it, so the marks save as a plain text file and load back. The layout is the one the video cutter writes, which means marks made against a video can be dropped onto its extracted audio and the other way round.
Look at the waveform
Marking sound by scrubbing is guesswork; marking it by eye is not. Silence looks like silence, a cough looks like a cough, and the four seconds of room tone before somebody starts talking are visible immediately instead of having to be found.
This matters most for the marks that people get slightly wrong: the start of a sentence usually wants to sit in the silence before the breath, not after it, and the end usually wants a beat of room tone rather than a cut on the final consonant. Both are obvious in the picture and almost impossible to hit by ear alone. Drag the ends of a marked part along the waveform to nudge them.
The gaps are where somebody stopped talking. That is what makes a waveform worth looking at rather than a stopwatch.
Trimming is not fading, and it is not editing
Three words that get used for each other. Trimming changes which parts of the recording survive. A fade — the musical kind, over seconds — is a deliberate effect on the level, and the few milliseconds described above are not that; they are click removal that happens to use the same arithmetic.
If what you want is the recording played backwards, sped up, slowed down without the pitch moving, or brought up because it was recorded too quiet, that is the Audio Editor. It is the same decoder and the same WAV writer; it just does different arithmetic in between.
Why this does not need an upload
Trimming is arithmetic over an array. The browser already has a decoder — it is the same one that plays the file in an <audio> element — and once the samples are decoded, keeping some of them and dropping the rest is a copy. There is no step in that description that a server could do better, and a round trip to one would be the slowest part of the whole job.
It is also a file type where uploading costs more than people think. Recordings are voices: interviews, lectures, calls, voice notes, therapy sessions, a child saying something you want to keep. The tool here has no network feature of any kind, and the page's Content-Security-Policy names every address it may contact, none of which belongs to this site.

